For many families, coloring eggs is a beloved part of spring celebration. For an outdoor and earth friendly twist on egg dyeing, look to the most vibrant palette of all—nature! Got eggs? Got spices? Got berries or vegetables heading towards the compost pile in the back of your fridge? Even got mud? Then you have all the ingredients you need to create beautiful eggs (and a super science experiment for kids).
This activity is featured in our April Activity Calendar. Get your free copy here.
The Guide
Step 1: Prep eggs.
Hard boil white eggs and let them cool to room temperature.
Step 2: Search for color outside.
While on a walk or just out in your yard, balcony or neighborhood, invite kids to spot colors in nature. If you see some fallen petals, new green grass or other colorful treasures, collect a few to add to you mix. Dirt comes in variety of shades and can be a fun source of color, too.
Step 3: Prep kitchen ingredients.
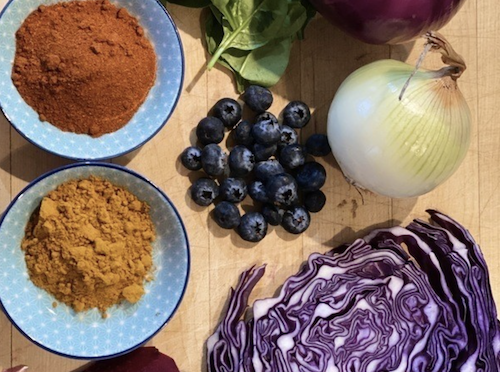
Roughly chop a variety of ingredients from your kitchen for dyeing (i.e. beets, yellow or red onions, red or purple cabbage, blueberries, spinach) and gather any spices you want to use (i.e. paprika, turmeric, black tea bags, coffee). Invite your child to explore the ingredients with their senses of sight, smell, touch and (when safe) taste. Wonder and predict together what will happen to each ingredient when cooked in water.
Step 4: Prepare dye.
Boil. Boil each ingredient in a separate pot of water (about 1 quart of water for each cup of your ingredient) for about 15-30 minutes. For more intense colors, boil longer. Let cool to room temperature. Pro Tip—Let kids play with some water and raw ingredients and paper to see what colors they can extract without cooking while you manage the pots!
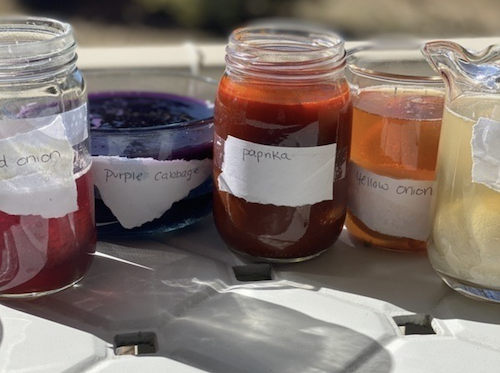
Pour into containers. Remove the solids from your pots and pour each dye into a jar or small container and label it with the ingredient you used to extract color. Notice with your child what colors each ingredient made. If you do this ahead of time, seal and store the dye liquids in the fridge until you are ready to use them.
Add vinegar. Mix in 1-2 tablespoons of vinegar in each jar. Kids can help with measuring, pouring and mixing. The acidic vinegar helps prepare the shell to receive the dye.
Step 5: Make a prediction.
Ask kids what they think will happen to the eggs when they are placed inside each of the jars. What color will white eggs become? What color will brown eggs become?
Step 6: In with the eggs.
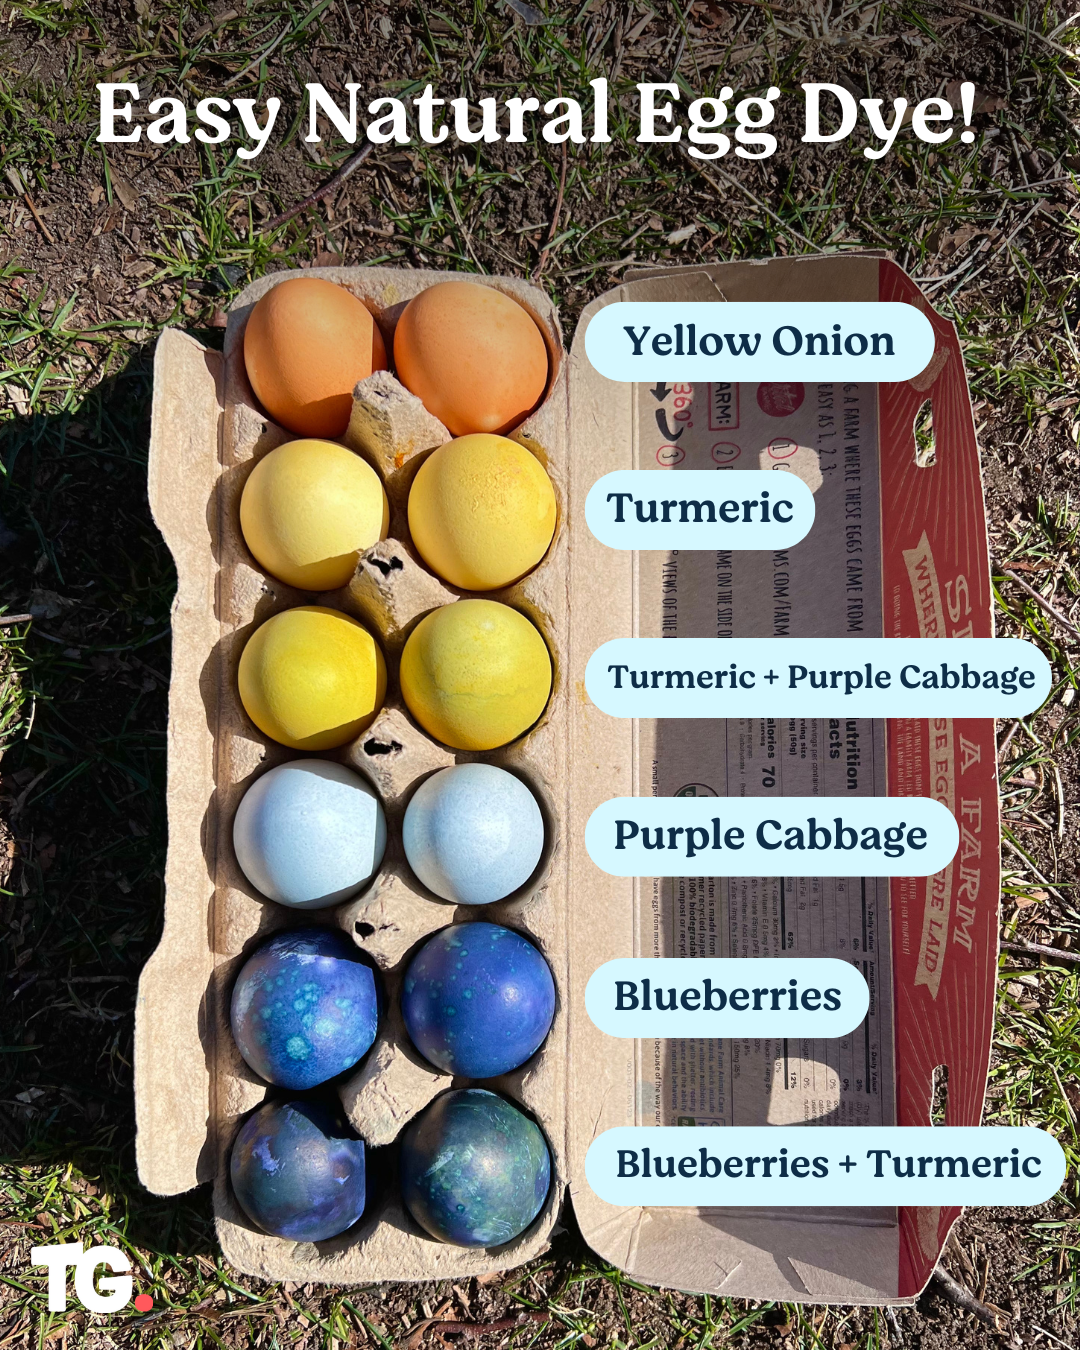
Invite kids to place the eggs in each of the jars and set aside in the refrigerator for at least 30 minutes. For more intense colors, leave in the refrigerator overnight. Or, explore color shades and intensity by leaving some eggs in the dye for longer than others.
Step 7: Reveal and display!
When you are ready to remove the eggs from their dye, make a celebratory moment of the big reveal. Were their color predictions correct? Display your eggs in a bowl or basket.
Why is this activity great for kids?
Extracting natural pigments and cooking down dye is a terrific way to introduce kids to STEM concepts like the states of matter, reactions and mixtures as well as processes like measuring and boiling. When kids guess how the ingredients will change the appearance of the water and eggs, they are making predictions and learning about cause and effect. Extracting color from natural ingredients also provides kids with a chance to use their observation skills and tune in to the fabulous colors in the natural world.
Curiosity means the ability and habit to apply a sense of wonder and a desire to learn more. Curious people try new things, ask questions, search for answers, relish new information, and make connections, all while actively experiencing and making sense of the world. To us, curiosity is a child’s ticket to engaging fully in learning and, ultimately, in life.
Why does it matter?
As a parent, this skill is, perhaps, the easiest to grasp and has the clearest connection to a young children’s learning. We all want my children to wonder, explore and drive their own learning and, better yet, to experience the world fully. Most teachers would agree that the curious children so often seem more attentive, involved and naturally get the most out of time in school. Even the research suggests that being curious is a driver of higher performance throughout one's life, as much if not more than IQ or test scores.
Fine Motor
Category:
Body Skills
What are Fine Motor skills?
Fine motor skills refer to how we coordinate small muscle movements in the hands and fingers in conjunction with our eyes. Children begin with whole arm movements at birth and refine their movement, using smaller muscle groups as their bodies develop. With time and practice, children are able to enhance and strengthen the movements in their fingers, becoming able to manipulate small objects and perform a range of important life and learning tasks.
Why does it matter?
Kids need fine motor skills in order to perform every day tasks like using fork and knife, turning a door knob, cutting with scissors and catching and throwing a ball. These same skills are essential for tasks associated with higher level learning like hand writing and typing on a keyboard. If kids enter school without good fine motor skills, they can not only fall behind, but learning can become very frustrating. Moreover, they can develop lasting negative attitudes towards learning and themselves as learners.
Sensory
Category:
Body Skills
What is Sensory Development?
Although some scientists classify as many as 20 senses, when childhood educators talk about "developing the senses," we typically mean developing the five standard senses: sight, hearing, touch, smell and taste. In addition to honing these senses, educators care about sensory integration, which is the ability to take in, sort out, process and make use of information gathered from the world around us via the senses.
Why does it matter?
The better kids are able to tune and integrate their senses, the more they can learn. First, if their senses are sharper, the information kids can gather should be of greater quantity and quality, making their understanding of the world more sophisticated. Further, until the lower levels of the brain can efficiently and accurately sort out information gathered through the senses, the higher levels cannot begin to develop thinking and organization skills kids need to succeed. Senses also have a powerful connection to memory. Children (and adults) often retain new learning when the senses are an active part of the learning.
So, if kids have more sensory experiences, they will learn more, retain better and be better able to think at a higher level. Makes the days they get all wet and dirty in the sandbox seem better, doesn't it?
 Age: 3 to 8+
 Time: 1 hour+
 Materials: eggs, spices, water, berries or other colorful natural objects